

How to transfer photos from iPhone to computer

Step:1
This article explains how to transfer photos from your iPhone to your Windows or Mac computer. You can use the "Photos" app built into your computer, or use "iCloud Photo" to transfer photos from iPhone to iCloud and then download them to your computer.

Step:2
Connect your iPhone to your Windows computer. Plug one end of the iPhone charging cable into the iPhone charging port and the USB port into the computer's USB port.
- If this is the first time the iPhone is connected to a computer, you need to tap Truston the iPhone and enter the iPhone's password or touch ID.

Step:3
Open iTunes. Its icon background is white with a colorful note on it. In order for the Windows computer to recognize the iPhone, be sure to open iTunes and let the phone connect to the computer.
- If you don't have iTunes on your computer, you need to install it before continuing.
- If iTunes prompts you to update, click Download iTunes . After the download is complete, you will need to restart your computer.

Step:4
Wait for the "Device" icon to appear. This iPhone-shaped icon will appear at the top left of the iTunes Library page. You can continue after you see it.
- It may take a few seconds for the iPhone to connect to iTunes.
- If the Library tab near the top of the iTunes window is not highlighted, click it to switch to the Library view.

Step:5
Unlock the iPhone. After the “Device” icon appears, enter the password, touch ID or face ID on the iPhone and press the Home button to unlock.
- If a prompt pops up asking you "Do you want to trust this computer?", tap Trust to continue.

Step:6

Step:7
Click on the photo . This mountain icon is somewhere in the Start window.
- If you can't find the Photos app, enter it at the top of the Start window 照片and click the photo app that appears .

Step:8

Step:9
Click on the slave USB device from the drop down menu . The computer will start scanning photos and videos on the iPhone for import.
- If the computer is connected to more than one USB device, first click on the iPhone name to continue.
- If the "Photos" app pops up a prompt saying that the USB device is not found, first close the "Photos" app, then reopen it and try again. It may take several attempts to display the iPhone.

Step:10
Select the photos you want to transfer to your computer. All photos on the iPhone will be selected at first, but you can uncheck the photos you don't want to import by clicking the checkmark at the top right of each photo.
- You can also click the Cancel link near the top in the "Select photos to import" window , uncheck all the photos, and click on the photos you want to import.
- If you plan to delete photos from your iPhone after completing the import, click the Import Settings link near the bottom of the window , check the box "Remove photos from device after importing" and click Finish .

Step:11
Click Import Selected Photos at the bottom of the window .https://www.hackingcrews.com/2019/06/how-to-transfer-photos-from-iphone-to-pc.html The computer will start importing photos. When finished, a notification message will appear in the lower right corner of the computer screen, which will separate the iPhone from the computer.
---------------------------------------------------------------------------------
Use the Photos app on your Mac

Step:1
Connect your iPhone to your Mac. Plug one end of the iPhone charging cable into the iPhone charging port and the USB port into the computer's USB port

Step:2
Unlock the iPhone. Enter your password, touch ID or face ID on your iPhone and press the Home button to unlock.
- If a prompt pops up asking you "Do you want to trust this computer?", tap Trust to continue.

Step:3
Open the Photos app
In the Mac's Dock, click on the icon for the Photos app, which looks like a colorful paper windmill.
In the Mac's Dock, click on the icon for the Photos app, which looks like a colorful paper windmill.
- The Photos app may open automatically when you connect your iPhone.
- The iPhone icon should appear in the top left corner of the Photos app window.

Step:4
Choose your iPhone. Click on the iPhone name that appears on the left side of the window and select it as the import source.

Step:5
Select the photo you want to download. Click on the photo in the window.
- If you want to import all the photos that your computer doesn't have, skip this step.

Step:6
Click on the selected photo in the upper right corner of the window . The button will display the number of selected photos, such as importing 5 selected .
- If you want to transfer photos that are not available on all Mac computers, click Import all new photos .

Step:7
Click Import on the left side of the window . The photos just transferred will be listed on this page.
---------------------------------------------------------------------------------
Use iCloud Photo Gallery

Step:1
Make sure there is enough space. This method allows you to upload all your photos to iCloud and then download them to any networked computer. However, iCloud's free space must be larger than the space occupied by the photo. iCloud offers 5gb of free space, you may need to upgrade your iCloud storage before you can store more photos.

Step:2
Open the iPhone's "Settings"
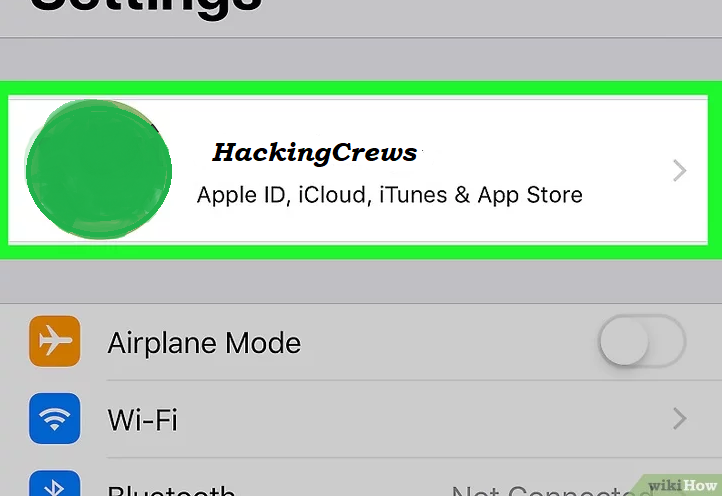
Step:3
Tap your Apple ID. It is at the top of the Settings menu and will display your name and avatar (if added).
- If you are not logged in, tap Sign in to iPhone , enter your Apple ID and password, and tap Login .

Step:4
Tap iCloud . It is located in the second part of the menu, near the middle of the screen.

Step:5
- Tap the photo . It's in the "Apps using iCloud" section near the top.

Step:6
Touch the white "iCloud Photo Gallery" switch The switch will turn green
At this time, as long as Wi-Fi is connected, the photos and videos on the phone will be uploaded to the iCloud account.
- If you have a lot of photos, you may need to upload them for hours and be patient.
- If you want to save iPhone storage, tap Optimize iPhone storage to keep smaller versions of your photos on your device.

Step:7
Touch the white "My Photo Stream" switch .It will turn green. Once connected to the network, photos taken afterwards will be uploaded to iCloud.

Step:8

Step:9
Log in to iCloud. Enter your Apple ID email and password, then tap → .
- If you are already logged in to iCloud, you can skip this step.

Step:10
- Click the Photos app .The icon is a colorful paper windmill.

Step:11
- Click the Photos tab at the top left of the page .

Step:12
- Select the photo you want to download. Hold down Ctrl (Windows) or Command (Mac) and click on each photo you want to download.

Step:13
Click the "Download" button
This cloud-shaped icon is located at the top right of the page with a downward pointing arrow. The photo will be downloaded to your computer and you may need to select the download location first.