How to install new fonts on your computer
Did you find the new font you want to use online? Installing new fonts on a Windows computer is very simple. No matter which version of Windows you use, the way to install new fonts is the same. In just a few steps, you can quickly install new fonts. Let’s take a look.
Find a reputable font website. There are countless font sites on the web that offer font download services. You'd better choose a reputable and reliable website to download font resources to prevent malware and viruses from infecting. Several popular font sites are:
- Dafont.com
- Fontspace.com
- Fontsquirrel.com.
Download the font file you want to install. You can download font files online from a variety of different websites. Windows systems support the TTF and OTF font file formats.
- Do not download any font files in EXE format, and do not download font files that require the installer. Most of them are malware or other programs you don't need.
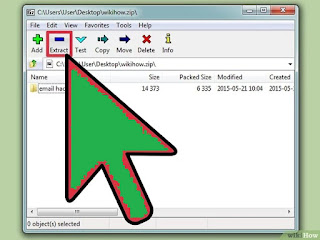
Unzip the font file (if needed). Some font files exist in a ZIP or RAR file format, which is usually packaged in a single package. Before installing such a font file, you need to extract the font file from the ZIP or RAR file.
- If you want to open the ZIP file, just double click on it and drag the font file onto the desktop.
- If you want to open a RAR file, you first need to install something like 7-Zip (7-zip.org) or WinRAR (Rarlabs.com) Such a free decompression program. After installing the program, double-click the archived file and drag the font file to the desktop.
- Open the control panel. The Control Panel program will allow you to install new fonts. The font installation operation is the same for all versions of Windows.
- Windows 7 and earlier versions of Windows - Click the Start menu and select "Control Panel".
- Windows 8 system - Press Win + X and select "Control Panel".
- Windows 8.1 and 10 systems - Right click on the Start menu and select "Control Panel"
Click on the "View" menu in the upper right corner of the window and select the "Icons" option. This browsing view makes it easy to find icons for font options.
Open the Fonts window. Open the font window by selecting the "Font" option in the Control Panel. All installed fonts on the current computer are listed in the window.
Drag and drop font files into the font window to install them. Make sure that the font file you are dragging is an OTF or TTF file, not a ZIP file. OTF and TTF files will have a font icon
Enter the administrator password (if you are prompted for a password). Installing the font requires administrator authorization. If you are the only user of your computer, you will not be prompted for an administrator password.
Use a new font. Once you have installed the font, you will be able to select and use the new font in the Windows font options of the program
Hint
- When installing new fonts, keep in mind that fonts can only be used and displayed on computers that have font files installed. If you share Office documents with others or want to use and browse your files on other computers, new fonts may appear differently on other computers than they do on your computer. If the current computer does not have a text-based original font installed, it may appear as Times New Roman or another default font.
- To make sure you can see new fonts on other computers, you can install new fonts on other computers, or if you are using TrueType fonts in Word or Microsoft PowerPoint®, you can embed them in a file. And save it together. Embedding fonts increases the size of the document and may not be suitable for some commercial-restricted fonts, but it's a great way to ensure that the new fonts in your document appear consistently on different computers.


